Do You Have to Dry Nut Shells to Make Art
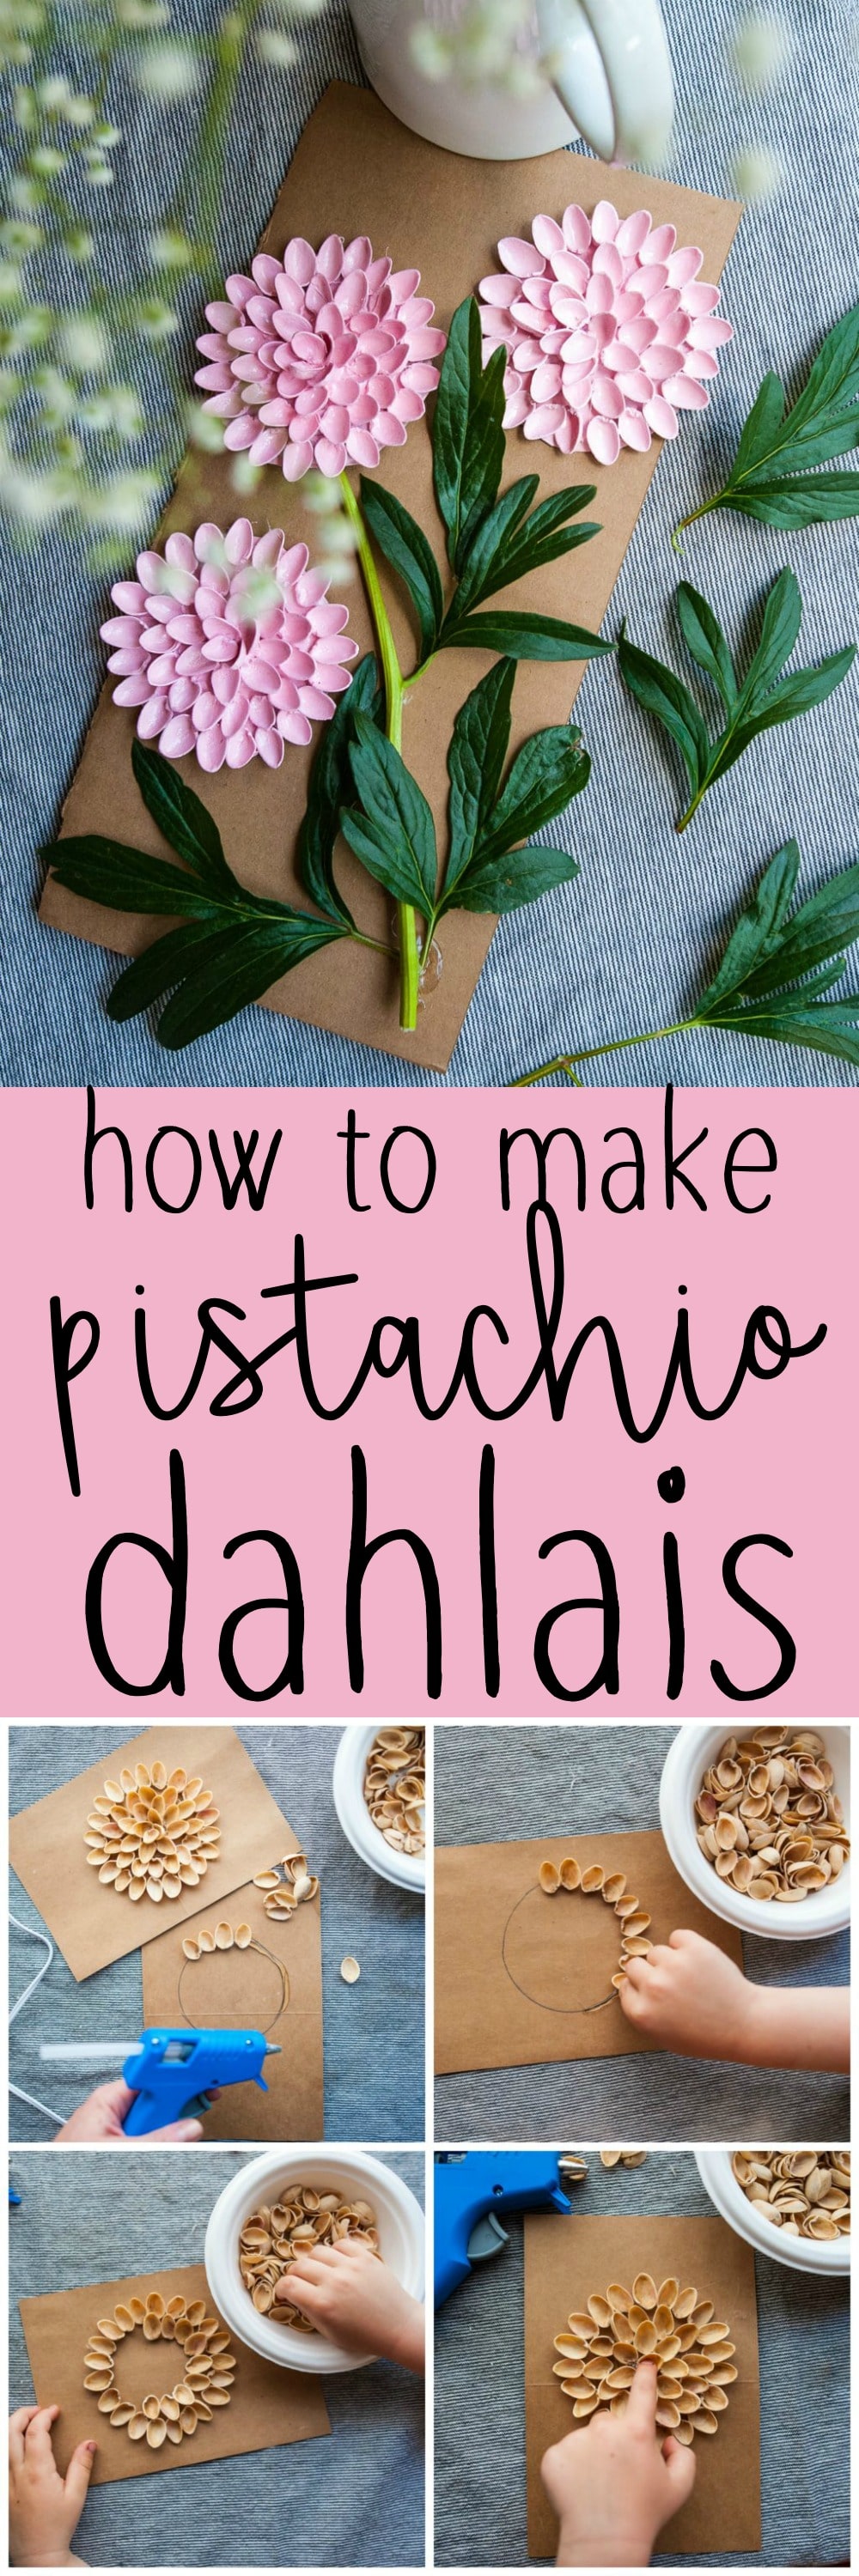
These Pistachio Dahlias are a fun way to create pretty summery fine art by using left over pistachio shells and recycled materials. They are unproblematic to brand, just plow out then vibrant and realistic looking!

My husband's grandmother has the most beautiful dahlias growing in her garden. I just love them then much and spend hours ogling at them when we visit and then dream about them for the rest of the summer. Someday I'll grow dahlias in my own garden, but for now, nosotros figured out how to make our own "dahlias" using leftover pistachio shells and spray paint! We'll explain how to brand them footstep-by-pace below.

materials y'all demand to make Pistachio Dahlias
- Pistachio shells
- Hot glue gun and gum sticks
- Spray pigment
- Scissors
- Cardstock newspaper
- Cardboard
- Leave and stems
- Pigsty punch
- Twine
Step-by-Step Instructions to brand your own Pistachio Dahlias
- Collect and clean pistachio shells – We used nigh 45 pistachio shell halves (or 23 whole pistachios) for one bloom, so y'all might demand to collect pistachio shells for a while. It only took u.s. a day or two, because my family snacks on pistachios all the time. Once you get several collected, grit off whatsoever of the dry parts that stick to the inside of the shell. No demand to wash the shell, just brand sure it'due south free of any messy imperfections. Put your make clean shells in a bowl and set aside.
- Draw a circle on a piece of cardstock newspaper – We used a wide-mouth canning jar to trace which fabricated an even circle. We traced it onto a piece of heavy cardstock. You want the newspaper to be sturdy, but non equally thick and heavy as cardboard.
- Trace the circle with hot mucilage – Once you accept you circle traced, grab your glue gun and add a strip of mucilage all the way around the circular shape. [Hint, nosotros added glue in portions. We added glue to the first quarter before moving on, so that information technology wouldn't dry out before nosotros were able to place the shells on pinnacle of the glue.]

- Press shells into the glue – Once you take a strip of glue on your circle, one past i, printing a pistachio beat out onto the glue until it sticks. You'll want the pointy office of the shell facing out and the sides curving upwardly, not down. They will resemble flower petals this manner.
- Keep placing shells in a spiral class – Continue calculation glue and placing the shells onto it in a spiral working from the outside in. Keep adding the shells ane by one until you become to the center and there is no more free space to fill. Information technology should resemble a bloom at this signal.
- Spray with spray paint – When all your shells are in place and the mucilage has dried, take your blossom outside to spray with spray pigment. I put ours in a cardboard box to make certain I didn't spray something else unintentionally. We used Candy Pinkish Rustoleum spray paint because it dries fast and sticks to everything. Nosotros had some left over from painting some furniture, simply you lot tin can find information technology online here or at whatever hardware shop. Be sure to spray carefully and cover every nook and cranny.
- Permit it dry and respray – I allowed an hour between each spray and I sprayed three times.

- Cut out flowers – Once your flowers are completely dry, take hold of a pair of scissors and cutting the circular bloom shapes out. Yous don't want whatsoever of the cardstock to show, and then be conscientious to cut as close the the flower petals as you can.

- Arrange and glue stems and leaves on a piece of cardboard – Now, you lot'll need to find stems and leaves to utilize for your blossom moving picture. We used real leaves and a stem from a different kind of blossom bush in our grand, but creating stems and leaves from newspaper or felt. Or even cartoon or painting them on would work likewise! If you are using existent stems and leaves, add together a dab of hot glue forth the stem and identify it on the cardboard. Hold firmly until it drives. Now, add a dab of hot glue to the leaves and arrange on the piece of cardboard around the stem.
- Accommodate and glue flowers onto the paper-thin – Add together some glue to the back of your flower circles and then suit them around the stem and printing down gently until the glue dries. Echo with the other two flower heads.

- Punch two holes at the top of the slice of paper-thin – Afterwards your stem, leaves, and flower heads have dried, grab a hole punch and add two holes at the summit two corners of your blossom film.
- String twine through the holes – Tie a piece of twine or cord in a knot in one of the holes, so measure out well-nigh 6 inches of the twine and tie the other terminate in the other hole.

- Display – Afterward yous're done, it's time to find a place to brandish your fine art! We hung ours outside on our front porch.

Materials
- Pistachio shells
- Hot glue sticks
- Spray paint
- Cardstock paper
- Cardboard
- Leave and stems
- Twine
Tools
- Hot glue gun
- Pair of scissors
- Hole punch
Instructions
ane. Collect and make clean near 140 pistachio vanquish halves (or 70 pistachios).
2. Draw a circle (about 3.five inches wide) on a piece of heavy cardstock paper. Using a wide-marth jar to trace works bang-up.
3. Once your circumvolve is drawn, grab a gum gun and add a sparse strip of glue all the style effectually the circular shape. [Hint, try adding glue in portions, and so information technology doesn't dry before you have fourth dimension to place all of your shells. Add together gum to the first quarter of the circle earlier moving on.]
4. Now, one past one, printing a pistachio shell into the glue until it sticks. The pointy role of the shell should be facing out and the sides should be curving up, not down.
5. Continue adding glue and placing the shells in a spiral, working from the outside in. Go along placing until you go to the middle and there is no more free infinite to fill. It should resemble a flower at this betoken.
half-dozen. When all the shells are glued in place on the piece of cardstock, accept your bloom outside to spray with spray pigment. [Hint. Try putting information technology in a paper-thin box to make sure you don't spray something else unintentionally.]
seven. After y'all have sprayed your flower thoroughly, let an hour to dry, and spray another coat. A third coat of pigment is optional.
viii. Once your flowers are completely dry out, grab a pair of pair of scissors and cut the circular flower shapes out.
9. Now, yous'll need to find stems and leaves to use for your flower picture. You could apply existent flower leaves and stems or creat them from felt or green paper. Or try drawing or painting it on. If you are using real stems and leaves, add a dab of hot gum forth the stem and place information technology on the cardboard. Hold firmly until it dries. Adjacent, add a dab of hot glue to the leaves and accommodate them on the piece of cardboard around the stem.
10. Add some glue to the back of your flower circles and then suit effectually the stem. Press down gently until the glue dries. Echo with the other ii flower heads.
11. Afterwards your stem, leaves, and flower heads take stale, grab a hold punch and add two holes at the top 2 corners of your flower picture.
12. Necktie a piece of twine or cord in a knot in 1 of the holes, then measure about 6 inches of the twine and necktie the other end in the other hole.
13. Now hang up somewhere to display your art!
Source: https://sproutingwildones.com/pistachio-dahlias/
0 Response to "Do You Have to Dry Nut Shells to Make Art"
Post a Comment